Wednesday, November 20, 2013

Simple Crock-Pot Cabbage Rolls


This weather makes me want to stay indoors and cook some hot delicious meals, just had this one last night for dinner, it was so good! You can also freeze the cooked cabbage rolls for later meals.
Ingredients:

1 Medium Head of Fresh Cabbage
1 Large Onion, diced
2 lbs of Beyond Meat Plant Based Hamburger
1 Cup Cooked White Rice
3 Eggs
2 Tablespoons Vegeta All Purpose Seasoning  
1 Can Tomato Soup
1 11.5oz Can V8
2 Tablespoons Worcestershire Sauce


Instructions:
   1. On the stove top, cook rice and set aside.
   2.  Remove the stem from the cabbage and peel each individual leaf back.
   3. Take head of cabbage and place it in a pot of boiling, salted water. Cover and cook 3 minutes, or until softened enough to pull off individual leaves. As the cabbage leaves loosen, remove them and drain in a colander.
   4. In a pan, cook onions until onions are clear in color.
   5. In a large bowl, add ground beef, eggs, vegeta, cooked onions and rice.
  
   6. Mix well.
   7. Taking one cabbage leaf at a time, add a spoon or more of the meat mixture. Using your hand, gather the meat on one end of the cabbage leaf and then roll the leaf.
   8. Chop remaining leaves coarsely and place them in the bottom of the pot. Layer the cabbage rolls into the bottom of a crock-pot. Layering as you add until all the meat mixture is used.
   9. In a bowl, mix the tomato soup, Worcestershire and V8 juice.
 10. Pour the mixture on top of the cabbage rolls.
 11. Cook on HIGH for 4 hours.


**If you don't have a crock pot- Cover baking dish with foil- Bake in oven at 375 for 2 hours.
What's your favorite Fall Or Winter dish to cook?

Wednesday, November 13, 2013

Easy Crock Pot Chili

I took a chili recipe and modified it to make it more to my liking. This came out delish! Two thumbs up, Yum, Yum!

Total Time- 4 hours 10 Min          
Servings- 8- 10

Ingredients:

2 lbs. Beyond Meat Plant Based Beef browned

1 can (15.5 oz.) Goya Red Kidney Beans, rinsed and drained

1 can (15.5 oz.) Goya Pinto Beans, rinsed and drained

1 jar (1lb. 8 oz.) Pasta sauce-( I used store brand, contained tomato, garlic, onion)

1 envelope Lipton Recipe Secrets Onion Soup Mix

6 tsp. Chili Powder

1 can (6 oz.) Tomato paste

1/2 cup water

Toppings Place Aside: Fritos "Scoop" Corn Chips, Sour cream, Sharp cheddar cheese

Preparation:
Combine all ingredients(Except toppings) in slow cooker and cook covered on High for 2 hours, Then set to low for another 2 hours( so 4 hours total cooking time). Serve with Fritos "Scoop" Chips, Sour cream, and Sharp Shredded Cheddar cheese.


Thursday, November 7, 2013

Launa's Easy Swedish Meatballs


From Launa:
Here is a Swedish meatball recipe I have used for years. 

Ingredients:

  • 1 1/2 pounds Beyond Meat Plant Based Hamburger
  • 1/4 pound Beyond Meat Plant Based Italian Sausage)
  • 1 egg
  • 1/4 cup ketchup
  • 2 tablespoons worcestershire sauce
  • 1 tablespoon dry mustard
  • 1 tablespoon soy sauce
  • 1 clove minced garlic
  • 2 teaspoons salt
  • 1 teaspoon pepper

  • SAUCE:
  • 2 cans cream of mushroom soup
  • 1 cup sour cream
  • 1 teaspoon worcestershire sauce
  • 1 dash tabasco sauce
  • 1/4 cup milk

Preparation:

Mix all ingredients together for the meat mixture. DO NOT OVER MIX! Roll into small balls and place on cookie sheet. Bake AT 350 for 45 minutes or until browned. In a medium bowl mix sauce ingredients together. May be used as main dish served over rice or noodles or as an appetizer served with toothpicks.
            Enjoy!!                                            

Monday, November 4, 2013

Creating The Perfect Sewing Room A New Trend

Sewing has always been a way of life to put clothes on your back. Your mother learned to sew from your grandmother. That changed in the 80′s when clothes became cheap and readily available. Today, once again sewing seems to grow popular and new technologies make sewing an easier task. A new trend is emerging and there’s a growing need for well planned sewing rooms.
Sewing is a great way to express your creativity and, if you truly enjoy it, unwind at the end of a long day. The process of choosing material, piecing it together, and making something beautiful is incredibly satisfying. You owe it to yourself to turn that empty room in your home into a place of your very own. Here’s what you need to create a perfect sewing room:

1.Paint

Your room is where you’ll spend your down time or, if you sew for a living, the better part of your day. It makes sense to slather the walls with a color that you love. You’ll find sites that tell you green is soothing, yellow is invigorating, and so on; pay no attention. Paint the walls in the color that feels right to you. You should know, however, that light colors will make a small room appear larger, and dark colors will make the walls shrink inward.

2.Sewing Table

After you’ve painted your walls, you’re ready to start putting furniture in your room. The very first section to set up is your sewing station. Everything else that you put in the room should be centered around this important area. Ideally, a U-shaped station is the best, an L-shaped station is the second-best, and a long table is the third choice. The size of your table will depend on the size of your room.

3.Cutting Table

Remember that you’re setting up a sewing room for yourself so you don’t have to adjust your fabrics and your machines as you work. Set up a cutting table next to your sewing table for the ultimate in ease. Your cutting table should be counter height as you’ll typically be standing, especially if you work with large decorator fabrics.

4.Pressing Area

If you have enough space in your new room, a pressing area is a convenient thing to have. If you don’t have room for a permanent pressing station, make sure that you leave enough room to set up your ironing board when you need it. You don’t want to have to take your fabric from room to room so that you can press it.

5.Lighting

Before you set up anything else, decide on how you will use lighting in the room. Natural lighting is always the best, but most rooms don’t have enough windows to let ample sunlight in. Additionally, you won’t always be sewing when the sun is shining. The more lights you have in your room, the better. An overhead light along with task lights at each station is the most beneficial. Use bulbs that simulate natural lighting to avoid eye strain as you work.

6.Chair

Your chair, unless you sew standing up, is as important as any other aspect of your room. There is no right chair for every sewer. You may find that a wooden chair is the most comfortable, or you may want an ergonomic chair. If you’ll be sewing for hours on end, it’s important that the place you sit supports you correctly. If you’re buying a new chair, be sure to test out several before you make a choice; never purchase a chair sight-unseen.

7.Wall Decor

You may have so many shelves and cubbies that you don’t have room for dramatic paintings, but do save room for an inspiration board. This can be a large corkboard or a big piece of canvas that you’ve covered with your favorite fabric and crossed with ribbon. Use the board to hang pages from magazines or pages you’ve printed from the Internet. You can also hang small swatches of fabric, ribbons or ephemera that you find spur your creative process.

8.Organization

No two people organize a craft room in the same way. A good rule of thumb is to keep the things you use most often nearest your main sewing station. Beyond that suggestion, you are free to organize however you like. Some people like open shelves where everything can be seen at a glance. Others like to store their things in jars and containers. Still other sewers like fabric bins or baskets that can be labeled that keep things out of sight. Look online for inspiration when it comes to organizing your room.
Your new sewing room will be your creative haven. You’ll find yourself drawn to the room as soon as it is set up. Use these tips to create a room that is tailor-made for you, your machinery and your projects. Set up correctly, your new room will serve as inspiration for all of the crafty things that you do.
Jennifer Ryder has always been creative and blogs to help others discover their crafty side. If you want to see more of her creations check out Jenn Ryder on her Google plus and follow her on Twitter @Jenn_Ryder.

Monday, October 21, 2013

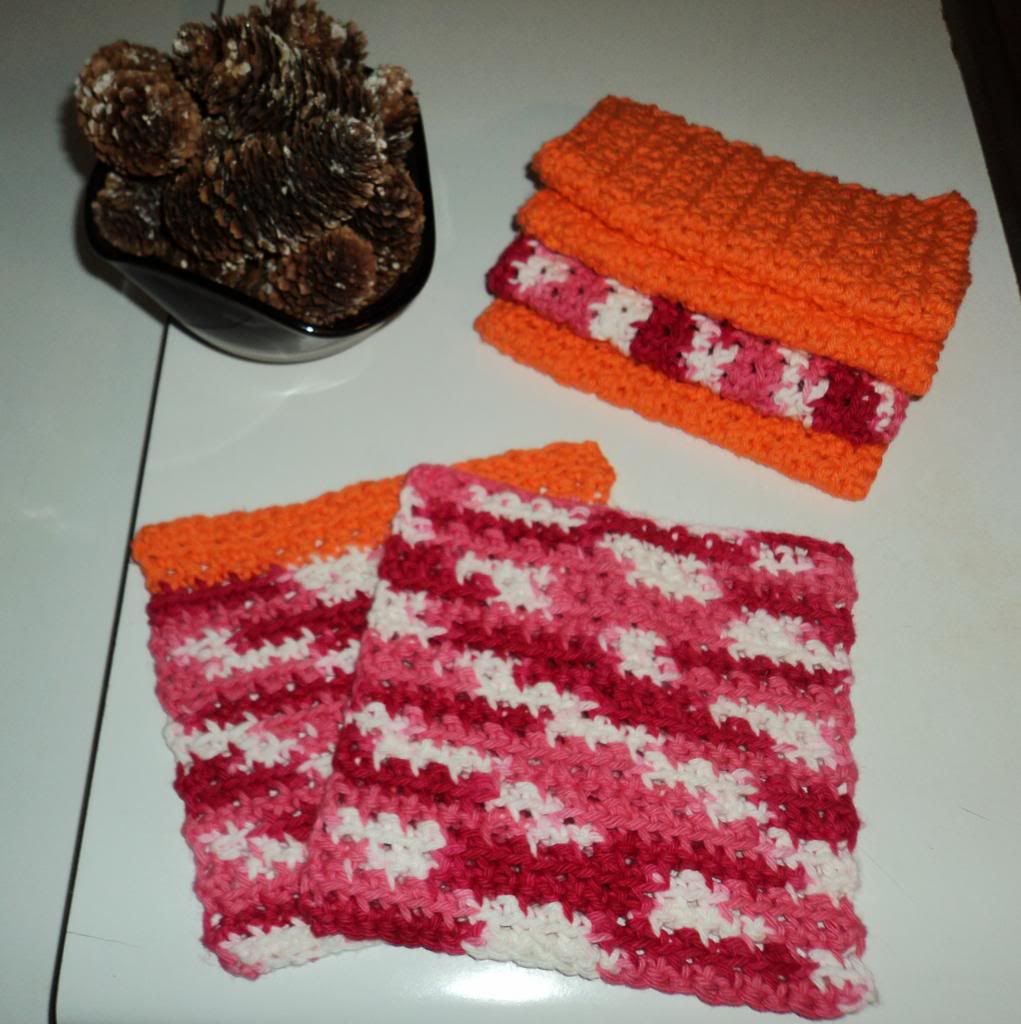
Easy Crochet Dishcloth Pattern


I been trying to fit in downtime to complete at least 1 Christmas gift every other week.

Thought I'd share this pattern find. You can create useful practical items, that can be used long after the holidays are over.

I used Peaches & Cream 100% Cotton Yarn, cloths came out nice and soft, but will be very durable!

My Cloths Measure:  6" x 6- 1/2" Wide


What holiday projects are you working on?

Pattern At  Mellie Blossom


Tuesday, October 15, 2013

Coffee Drinkers~ Homemade Coffee Creamer


Homemade Coffee Creamer – Over 2 Dozen Flavor Varieties!

Whatever flavor of creamer you want, you start off with the same basic ‘base’ recipe.

Base:
14oz sweetened condensed milk
1 3/4 cup milk or cream (whole, lowfat, skim, almond, soy, heavy cream, half & half etc – whatever your preference, however the more fat, the more creaminess)

Mix the ingredients together well. Add them to a mason jar and shake it like crazy or you could also opt to use an old (washed) creamer container.
**********************************
 French Vanilla Creamer
 2 teaspoons vanilla extract OR vanilla coffee syrup
 Vanilla Bean Coffee Creamer
 2 teaspoons vanilla bean paste

Chocolate
 2-3 tablespoons chocolate syrup
 (1 tsp vanilla extract, optional)

 Chocolate Almond
 1 tablespoon cocoa powder
 1 teaspoon almond extract

Strudel
 1 tablespoon cinnamon
 1 teaspoon vanilla extract
 1 teaspoon almond extract
 Vanilla Caramel
 2 tablespoons caramel ice cream topping
 2 teaspoons vanilla extract

Chocolate Raspberry
 2 teaspoons cocoa powder
 2 tablespoons raspberry syrup

Irish Cream
 2 tablespoons chocolate syrup
 1 teaspoon instant coffee
 1-2 teaspoons vanilla extract
 1 teaspoon almond extract

Coconut
 2 teaspoons coconut extract
 Samoa (like the Girl Scout Cookies)
 2 teaspoons coconut extract (or sub coconut milk or cream of coconut, heated & strained, for the milk/cream)
 2 tablespoons chocolate syrup
 2 tablespoons caramel ice cream topping

Peppermint Patty
 2 tablespoons chocolate syrup
 1 teaspoon peppermint extract
 Cinnamon Vanilla
 2 teaspoons cinnamon
 2 teaspoons vanilla extract

 Pumpkin Spice
 3 tablespoons pureed pumpkin
 1 teaspoon pumpkin pie spice
 4 tablespoons maple syrup
 1 teaspoon vanilla extract

 Honey Vanilla
 1/4 cup honey
 2 teaspoons vanilla extract

Almond Joy
 1-2 teaspoons coconut extract (or sub coconut milk or cream of coconut if you heat it first, strained, in place of the milk & extract)
 1 teaspoon almond extract
 2 tablespoons chocolate syrup

Sweet Cream
 Use 1 3/4 cups of heavy cream instead of the milk in the base recipe
 2 teaspoons vanilla extract OR the inside of a vanilla bean, scraped
 1 teaspoon almond extract
 Chocolate Orange
 2 tablespoons chocolate syrup
 1-2 teaspoons orange extract

 Hazelnut
 2 teaspoons hazelnut extract
 Chocolate Hazelnut
 2 tablespoons chocolate syrup
 2 teaspoons hazelnut extract

Cinnamon Cake
 2 teaspoons cinnamon
 2 teaspoons vanilla extract
 Salted Caramel
 2-3 tablespoons caramel ice cream topping
 1/2 teaspoon salt

Eggnog
 replace milk in base recipe with equal amount of heavy cream
 1 teaspoons vanilla extract
 2 teaspoons rum extract
 1 teaspoon ground nutmeg
 Toasted Almond
 2 teaspoons almond extract

Directions & Tips:
 In all these recipes, anything that has a dry or thick ingredient (like cinnamon, honey, etc..) should be heated up with a small amount of your milk/cream from the base recipe so it can dissolve properly. You don’t want grainy creamer! Then, add the rest of the milk/cream along with the sweetened condensed milk.

If you want really creamy creamer, use heavy cream instead of milk in your base recipe.

Label  jar with the expiration date from the milk used. This serves as a guideline as to when the creamer should be used by.

You can play around with the amounts of extracts and other ingredients used if you like stronger or less intense flavors!!


Tuesday, September 24, 2013

Doing Something Wild & Crazy!